Saturday, 22 October 2011

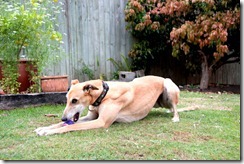
Meet Jess aka PJ (Princess Jessica)

It started a couple of months ago. “Mum come and look at this” had me looking at yet another web page photo, one of the girls had found, of some poor sad looking dog who was in foster care and desperately needed a home. They wanted another dog and used every ploy. It worked. ;-)

We are now the official proud owners of Jess an ex racing greyhound. Jess had been in foster care for a couple of months after some critical dental work to remove diseased teeth. (Racing dogs have glucose smeared onto their teeth before races apparently). We adopted her from a wonderful organisation called Friends of the Hound. I highly recommend them. They are totally professional, well organised and have the welfare of the dogs as number 1 concern.

Jess is nearly 8 and has settled in well. She was a little thin when she came to us and we have worked on fattening her up. A diet of puppy food, organic eggs and meat and tinned sardines for the last 3 weeks and she is now 1kg heavier. This is a dog who does not mind being cuddled and kissed 24/7, perfect for us and for her. A match definitely made in heaven. Isn’t she gorgeous!

DSC_4432DSC_4435DSC_4446DSC_4447


Here are a couple of layouts, the first of many.


Have a wonderful weekend everyone!
Monday, 17 October 2011

Beach Sunrise

Photos taken yesterday morning watching the sunrise at Bribie Island.


Beautiful shades of peach and grey/blue.

Saturday, 8 October 2011

Watercolour Painting with Paintshop Pro

For those who commented on my "painting" in the forum earlier this week, I have put together the steps I took to achieve the effect. It uses a combination of techniques from Photoshop tutorials adapted for PSP.

 Here is the original image that I was working from. I took this photo in Rajasthan, India in 2006.


Method
  1. 1.       Duplicate your image and blur. (Adjust/Blur/Gaussian Blur of radius 3)
    2.       Duplicate this layer and apply Artistic Effect/ Glowing Edges. (I used default 3.20)
    3.       Invert this layer. (Image/Negative Image)
    4.       Convert glowing lines to greyscale and desaturate to approximately 40%.
    5.       Duplicate the layer from step 1 and drag this layer to the top. Invert this layer (as in 3) and set the blending mode to Dodge. The image will be mostly white and this will be the base to paint (i.e. reveal the image with colour below).
    6.       Now comes the fun part. Using a variety of brushes with colour set to black and opacity at no more than 40% you start painting the brush strokes. As you are working on a dodge layer, the effect of this will be to reveal the underlying colours of the photo. Use a variety of brushes (I used dry brush and van gogh). You can build up colour by going over areas more than once. It is better to work with larger brush strokes and move down to smaller to fill in detail.
    7.       Lastly you can merge the layers and add a subtle texture effect eg. Canvas fine.

    Vary the parameters to achieve different effects. 
    Here is another one that took just 5 minutes. Al Hajjar in Yemen.